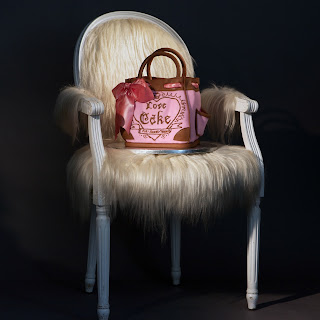
The wonderfully talented Pattie Boyd recently took some photographs of the designer handbag cake I made on the Fair Cake workshop with Kaysie Lackey; I'm absolutely delighted by the results.
Tuesday, 1 November 2011
Wednesday, 21 September 2011
Designer handbag cake with flamboyant silky pink ribbon
I am the proud owner of an over-sized pink handbag; it almost seems a shame to eat it. It's the result of a course taught by the incredibly talented (and Food Network Champion) Kaysie Lackey of The People's Cake at Fair Cake's new Vanilla Workshop.
Labels:
Courses,
Liz's cakes
Tuesday, 30 August 2011
Seriously lemony birthday cake covered with yellow and orange flowers
This cake is a lemon sponge, soaked with lemon syrup (with just a dash of limoncello), filled with lemon buttercream and lemon curd...seriously zingy!
Labels:
Birthdays,
Liz's cakes
Saturday, 27 August 2011
Three Tier White Wedding Cake with Pearl Border and Fresh Flowers
I made this cake for Laetisia and Stuart for their wedding in Oxford. The bride and groom had an Alice in Wonderland / tea party theme and the cake was cut on a boat after the ceremony.
I wanted to make cake that would fit the look and feel of the day but also be easy for the best man to transport from London to Oxford and then really straight forward for the wedding party to assemble.
The bottom tier was a light fruit cake and the top two tiers were vanilla sponge filled with strawberry jam and vanilla butter cream.
Feedback from the bride: "Thank you so, so much for the beautiful cake, we loved it! It looked so beautiful and tasted gorgeous and the bridesmaids managed to put the flowers onto the cake just before everyone arrived!"
Friday, 12 August 2011
Indian-inspired ruby wedding anniversary cake for my parents-in-law
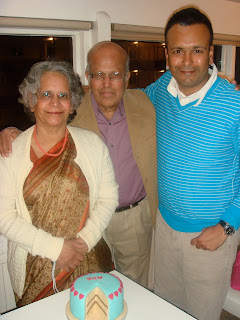
Last weekend my parents-in-law celebrated their 40th wedding anniversary. Many friends and family took part in party; cousins sang, friends performed Indian classical music, Mihir prepared a slide show of photos of their forty years of marriage....My contribution was the cake - a two-tiered, masala tea-infused fruit cake. The paisley border decoration was inspired by the beautiful ruby sari my mother-in-law wore for the party.
Thursday, 11 August 2011
Pavlova Diaries features Lizzie's Pretty Scrumptious Cakes!
My first ever interview as a cake-maker, by Mary Lu of Pavlova Diaries. Hopefully the first of many to come!
Saturday, 6 August 2011
Designer make-up bag cake with sparkly red nail varnish
This cake is for a make-up crazy 18 year old, to help her celebrate her landmark birthday in some serious style. The cake itself is a rich dark chocolate cake, filled with chocolate ganache and raspberry jam, covered in chocolate buttercream and then sugarpaste.
Saturday, 9 July 2011
Daisylicious cupcakes
Cupcakes for a summer party - these sweet cakes are zingy lemon sponge, filled with a lemon curd "surprise" and topped off with a swirl of tangy lemon frosting and some daisy and rose decorations.
Friday, 1 July 2011
London calling
This cake is a freshly baked vanilla sponge, filled with tasty Dalesford Organic strawberry jam and buttercream. I find shopping for the ingredients for my cakes almost as enjoyable as the baking itself. I love supporting local and am lucky enought to have a fantastic Farmers' Market on Kensington Church Street. The eggs and butter were all bought there.
Sunday, 29 May 2011
Handbag cake with an ipod
This weekend I went on another of the wonderful Julia Francis' cake courses. We made a cake in the shape of a handbag. Next time, I'll be making an Anya Hindmarch or Louis Vuitton...
Monday, 16 May 2011
Monkeying around
My darling husband wanted all his favourite things in his birthday cake, so I made up a chocolate and banana cake recipe especially for him.
Sunday, 10 April 2011
Small scrumptious cakes
Sunday, 3 April 2011
Birthday cake double bill
This may well get me into trouble with my mother-in-law...I had told her the missing slice from her cake was a special design feature. Little did she realise the missing slice was used for the benefit of another birthday cake! (Sorry Snigdha if you are reading this!)
Saturday, 19 March 2011
Cupcakes!
Another amazing Julia Francis cake class at Hammersmith and Fulham College...this time decorating cupcakes.
We learnt buttercream swirls and how to create sparkly stencil patterns.
We learnt buttercream swirls and how to create sparkly stencil patterns.
Labels:
Courses,
cupcakes,
Liz's cakes
Hen do cake with pink L plates and a white stiletto
My first request for a hen do cake - a luscious chocolate cake with raspberry jam and butter cream, topped with a white stiletto!
Labels:
Hen do,
Liz's cakes
Saturday, 26 February 2011
Tennis-tastic cakes
Here are some of my latest cakes - this time with a tennis theme.
This is my first attempt at making run outs ie piping royal icing into shapes, in this case some old-fashioned looking tennis rackets.
This is my first attempt at making run outs ie piping royal icing into shapes, in this case some old-fashioned looking tennis rackets.
Monday, 7 February 2011
How to do brush embroidery
To decorate a cake using brush embroidery, you will need:
· Miniature cakes covered in sugarpaste
· Small quantity of royal icing
· Small bowl
· Clean, damp cloth
· Small palette knife
· Piping bag
· No 4 nozzle
· Small brush
· Water
1. Give the royal icing a good mix and make sure it’s really smooth, especially if you made it a few days before
2. Fill your piping bag with the royal icing, keeping any spare in an airtight container or if it's in a bowl, covering with a clean, damp cloth to prevent it from crusting over
3. Pipe your chosen design onto the cake - using a thickish line
4. While the icing is still damp, using a small damp brush, draw the icing into the centre of the shape to create a 3D “embroidery” effect
Tips:
· Make sure your brush isn’t too wet and make sure to pipe a thick enough line, as the centre of the shape / flower should be covered with icing
Labels:
brush embroidery,
how to...,
Liz's cakes
Tuesday, 1 February 2011
What a peach
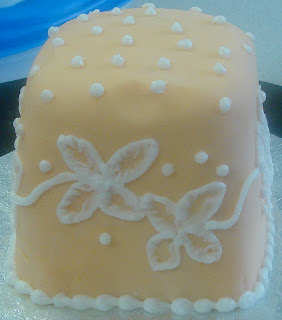
I'm having a very orange-infused week, inspired by all the bright tangerine shades going down the catwalk. This cake, with my first attempt at a technique called "brush embroidery", is a very subtle peach, but bright and colourful is never far away chez les Warty...
Sunday, 30 January 2011
In search of the perfect chocolate cake
How to make the perfect chocolate cake? This is my current obsession...
This weekend, having baked two styles of chocolate cake and made cupcakes, decorated with vanilla frosting and topped with raspberries, I have been using friends and family as my tasting panel.
So far, the more serious cake, made with, among other things, sour cream, ground almonds and organic chocolate pieces is winning hands down over the lighter, sweeter competitor. More tastings are scheduled for this week...
If you have an amazing chocolate cake recipe, please let me know!
Friday, 28 January 2011
A Chelsea Football Club cake for a 50th birthday party
Oh boy, has this Chelsea FC cake got me into trouble with my Spurs-mad husband. And apologies to Jane, Richard, Denise and all the other Tottenham fans out there...
Labels:
Birthdays,
Liz's cakes
Tuesday, 25 January 2011
Sneaky preview of my frilly cancan inspired miniature cake
I am camera (and husband) -less this week :( so I've taken a quick shot of my latest cake with my phone (sorry it's so grainy!)...I will be writing up a "how to make this frilly cake yourself at home guide" later this week, once the camera (and more importantly my husband) are back in the country!
Labels:
Liz's cakes,
miniature cakes
Sunday, 23 January 2011
How to make adorable miniature iced cakes
Miniature cakes are extremely popular at the moment.
Not only do they look adorable but, because of their little size, they help those of us who might be watching our waistlines and / or our pockets.
These small luxuries can help celebrate any occasion. A stack of miniature cakes along with a single, 6 inch cake tier would be a lovely alternative to a traditional tiered wedding cake.
Here is my guide to making miniature cakes covered in marzipan and sugarpaste. Ideas to decorate these mini cakes will follow over the coming days and weeks.
You will need:
A cake, icing sugar, apricot jam, marzipan, boiled water or clear alcohol, a little white vegetable fat such as Trex and sugarpaste.
 |
| Fruit cake, icing sugar, apricot jam and marzipan |
You will also need the following equipment:
3) Place your cake onto a small board and coat your cake with the apricot glaze (this is just apricot jam which has been heated till it just starts to bubble, which is then sieved and cooled). This acts as a glue for the marzipan
4) Sprinkle your work surface and rolling pin with a little icing sugar, using a shaker if you have one. Kneed the marzipan, this releases all the oils. Roll out about 250g of marzipan between a pair of spacers – these ensure the marzipan is an even thickness and also thick enough so ensure it doesn’t tear. When you roll out the marzipan, roll in one direction then give it a small turn after each roll, this will make sure you roll it in a nice round shape.
5) Lay the marzipan over the cake. If it is a square cake, tuck in the corners first, then shape the rest around the cake.
6) Cut off the excess marzipan using a pizza wheel, cutting in quite close, leaving only a 1mm edge.
7) Dust a smoother with icing sugar and use it to "polish" the sides and top of your cake.
8) Leave the covered cake for 24 hours to dry.
9) Brush the marzipan with (cooled) boiled water or a clear spirit (again, this acts as a glue).
10) Rub a (very!!) tiny amount of white vegetable fat (eg Trex) onto your surface and rolling pin. Kneed then roll out the sugarpaste using spacers to create the right thickness. As with the marzipan, turn a small amount after rolling to keep paste in a nice round shape.
11) Place the sugarpaste over the cake. Tuck down at each corner by forming a cup shape with your hands.
12) Cut off the excess sugarpaste with a pizza wheel and "polish" with a pair of smoothers.
And that’s it! Your cakes are now ready to decorate!
Labels:
Liz's cakes,
miniature cakes
Subscribe to:
Comments (Atom)


